翻译: Git from the bottom up | 自底向上聊 Git
这是一个 git from the bottom up 的中文翻译.
由于译者水平有限, 保留了英文, 防止误解.
如果真有人看, 还发现了什么错误, 欢迎提 issue, 欢迎 pr.
为了保持整个文章在一个文件里面所以我并没有单独保存图片文件, 引用了原文的图片链 接, 只要原文不挂应该问题就不大.
This text is licensed under Creative Commons BY 4.0. Please see the text of that license here:
https://creativecommons.org/licenses/by/4.0/legalcode
0 Introduction | 介绍
Welcome to the world of Git. I hope this document will help to advance your understanding of this powerful content tracking system, and reveal a bit of the simplicity underlying it — however dizzying its array of options may seem from the outside.
欢迎来到 Git 的世界. 我希望这个文档可以加深读者对这一个内容跟踪系统的认识. 虽然 Git 的操作选项从使用者的角度看起来令人头晕眼花, 但是我希望借这篇文档展示它底层的 简洁性.
Before we dive in, there are a few terms which should be mentioned first, since they’ll appear repeatedly throughout this text:
在我们进一步讨论之前, 有几个名词我们需要先做出一些解释, 之后我们将在这篇文章中不 断地见到他们.
0.1 repository
- repository — A repository is a collection of commits, each of which is an archive of what the project’s working tree looked like at a past date, whether on your machine or someone else’s. It also defines HEAD (see below), which identifies the branch or commit the current working tree stemmed from. Lastly, it contains a set of branches and tags, to identify certain commits by name.
- repository — repository 是由若干 commit 组成的集合, 这些 commit 可以存在你的机器上, 也可以在其他的地方, 它们是 working tree 曾经状态的存档. repository 同时定义了 HEAD (下面有), 它标志着当前的 working tree 的来源. repository 还含有一个由 branch 和 tag 组成的集合, branch 和 tag 可 以看作是某个 commit 的别名, 用户可以通过这个别名来找到某个 commit.
0.2 the index
- the index — Unlike other, similar tools you may have used, Git does not commit changes directly from the working tree into the repository. Instead, changes are first registered in something called the index. Think of it as a way of “confirming” your changes, one by one, before doing a commit (which records all your approved changes at once). Some find it helpful to call it instead as the “staging area”, instead of the index.
- the index — Git 并不像其他你使用过的类似工具那样直接把 working tree 中 的更改直接 commit 到 repository 中, 而是先将 working tree 中的更改注册到 一个叫 the index 的地方. 你可以把这看作是 Git 要求你在做一个 commit 之前, 对你的每个更改的再次确认, 这个 commit 将会一次性记录所有你再次确认过的更改. 有 人认为与其叫它 the index 不如将其称作 staging area (暂存区).
0.3 working tree
- working tree — A working tree is any directory on your filesystem which has a repository associated with it (typically indicated by the presence of a sub-directory within it named
.git.). It includes all the files and sub-directories in that directory.
- working tree — working tree 是在你的文件系统中任何一个与某个
repository 相关联的文件夹, 通常来说这样的文件夹都会有一个叫
.git的子目录. 一个 working tree 包含了这样一个文件夹下所有的文件和子目录.
0.4 commit
- commit — A commit is a snapshot of your working tree at some point in time. The state of HEAD (see below) at the time your commit is made becomes that commit’s parent. This is what creates the notion of a “revision history”.
- commit — commit 是某个时间点上你的 working tree 的一个快照1. 当 你提交一个 commit 的时候, HEAD 指向的 commit 会成为你提交的 commit 的父 commit. 这个机制让我们得以追溯修改的历史.
0.5 branch
- branch — A branch is just a name for a commit (and much more will be said about commits in a moment), also called a reference. It’s the parentage of a commit which defines its history, and thus the typical notion of a “branch of development”.
- branch — branch 只是某个的 commit 的别名2, 也可以认为是一个引用. 它是一个 commit 的来历, 记录着我们是如何到达这个 commit 的. 这很好地体现了分支 开发的理念.
0.6 tag
- tag — A tag is also a name for a commit, similar to a branch, except that it always names the same commit, and can have its own description text.
- tag — tag 是另一种 commit 的别名, 和 branch 很类似, 除了它永远都是 某个特定 commit 的别名, 以及一个 tag 可以有它自己的说明文字.
0.7 master
- master — The mainline of development in most repositories is done on a branch called “master”. Although this is a typical default, it is in no way special.
- master — 大部分主要的开发都在一个叫 “master” 的分支上完成, 这只是一个 默认的名称, 并没有什么特殊的.
0.8 HEAD
- HEAD — HEAD is used by your repository to define what is currently checked out:
- If you checkout a branch, HEAD symbolically refers to that branch, indicating that the branch name should be updated after the next commit operation.
- If you checkout a specific commit, HEAD refers to that commit only. This is referred to as a detached HEAD, and occurs, for example, if you check out a tag name.
- HEAD — HEAD 是被你的 repository 用来确定什么东西是当前 checkout 的:
- 如果你 checkout 一个 branch, HEAD 就会指向那个 branch, 这意味着这个 branch 在下一次 commit 之后会更新.
- 如果你 checkout 某个特定的 commit, 那么 HEAD 只会指向那个 commit. 发生这种事 情的时候, 我们称一个 HEAD 处在脱离的状态. 当你 checkout 一个 tag 的时候也会 发生这样的事情.
The usual flow of events is this: After creating a repository, your work is done in the working tree. Once your work reaches a significant point — the completion of a bug, the end of the working day, a moment when everything compiles — you add your changes successively to the index. Once the index contains everything you intend to commit, you record its content in the repository. Here’s a simple diagram that shows a typical project’s life-cycle:
通常来说, 你用 Git 工作的流程是这样的: 在创建一个 repository 之后, 你在 working tree 中完成工作. 每当你完成了一个阶段的工作, 比方说修正了一个 bug, 或者下班了, 还有比如"终于能过编译了!",你就把所有的更改都一个一个添加到 the index 中. 当 the index 中包含了所有你想 commit 的内容, 你就将这个 commit 的内容加入到 repository 中.这里有一个简单的示意图,展示了一个项目通常的生命周期:
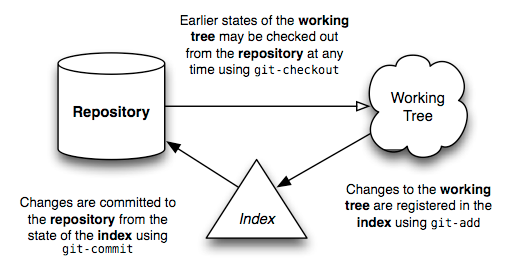
With this basic picture in mind, the following sections shall attempt to describe how each of these different entities is important to the operation of Git.
请将上述的内容记在心里, 接下来的几节我们将说明这些东西对 Git 的操作的重要性.
1 Repository
1.1 Repository: Directory content tracking | Repository: 目录内容跟踪
As mentioned above, what Git does is quite rudimentary: it maintains snapshots of a directory’s contents. Much of its internal design can be understood in terms of this basic task.
就像上面提到的一样, Git 实际上做的事情非常的基础: 只是在维护一个目录里的内容的快 照. Git 的许多内部设计都可以从这个角度来理解.
The design of a Git repository in many ways mirrors the structure of a UNIX filesystem:
Git 的 repository 的设计很多时候都和 UNIX 的文件系统很相似:
A filesystem begins with a root directory, which typically consists of other directories, most of which have leaf nodes, or files, that contain data. Meta-data about these files’ contents is stored both in the directory (the names), and in the i-nodes that reference the contents of those files (their size, type, permissions, etc). Each i-node has a unique number that identifies the contents of its related file. And while you may have many directory entries pointing to a particular i-node (i.e., hard-links), it’s the i-node which “owns” the contents stored on your filesystem.
文件系统 是从根目录开始的, 通常它会包括其他的所有目录. 大部分的目录会含有叶子 节点或者说是 文件 , 文件中才真正含有数据. 关于文件内容的元数据同时被存放在目 录里, 以及引用这个文件的内容的那个 i-node 里. 在目录里只存了个文件名, 而在 i-node 中存放着文件的大小, 类型, 权限等等. 每个 i-node 有一个唯一的编码, 用于区 分它关联的文件内容, 但是要注意: 是可能会出现多个文件目录指向了同一个 i-node 的 情况的(比如说硬链接). 总的来说,是 i-node 最终管理着你存在文件系统里的数据文件.
Internally, Git shares a strikingly similar structure, albeit with one or two key differences.
从内部逻辑的角度来看, Git 除了一两处关键的不同之处以外, 与这个结构有着惊人的相 似.
First, it represents your file’s contents in blobs, which are also leaf nodes in something awfully close to a directory, called a tree. Just as an i-node is uniquely identified by a system-assigned number, a blob is named by computing the SHA1 hash id of its size and contents.
首先, Git 将你的文件内容以 blob 的方式呈现. 而 blob 也是一个和目录十分类似的 树形结构中的叶子节点, 这里我们直接将这种树形结构称为 tree. 和 i-node 有一个系 统赋予的, 独一无二的值一样, 一个 blob 也有一个独一无二的标识符, 而这个标识符也 就是这个 blob 的名字是从它的大小和内容运用 SHA1 哈希算法计算得出的.
For all intents and purposes this is just an arbitrary number, like an i-node, except that it has two additional properties:
这个值具体是什么并不重要, 在 Git 中我们基本上就是需要一个值来唯一地确定一个 blob, 这一点上和 i-node 很类似. 但是这个通过 SHA1 计算出来的哈希值却有两个额外的 性质:
first, it verifies the blob’s contents will never change; and second, the same contents shall always be represented by the same blob, no matter where it appears: across commits, across repositories — even across the whole Internet. If multiple trees reference the same blob, this is just like hard-linking: the blob will not disappear from your repository as long as there is at least one link remaining to it.
首先, 这个值能够保证一个 blob 的内容不会被随意更改; 其次, 只要 blob 的内容一样, 他们总会有同一个标识符, 即使他们在不同的地方也一样: 在不同的 commit 之间相同内 容的 blob 会有同一个名字, 不同仓库间的 blob 也一样, 即使是网络上的其他地方的 blob 也一样. 如果有多个 tree 引用了同一个 blob, 这情况几乎就和硬链接没什么两样: 直到没有 tree 引用这个 blob 了, 它才会从你的 repository 中消失.
The difference between a Git blob and a filesystem’s file is that a blob stores no metadata about its content. All such information is kept in the tree that holds the blob. One tree may know those contents as a file named “foo” that was created in August 2004, while another tree may know the same contents as a file named “bar” that was created five years later.
Git 中的 blob 和文件系统中的文件的一大区别就是 blob 中并没有存储与其内容相关的元 数据. 这些信息是存放在引用这个 blob 的 tree 中的. 某个 tree 也许会觉得这个 blob 中的内容是一个叫 “foo” 的, 于 2004 年八月创建的文件, 同时另一个 tree 却会认为同 样的一个 blob 对应着名叫 “bar” 的, 五年后才被创建的文件.
In a normal filesystem, two files with the same contents but with such different metadata would always be represented as two independent files. Why this difference? Mainly, it’s because a filesystem is designed to support files that change, whereas Git is not. The fact that data is immutable in the Git repository is what makes all of this work and so a different design was needed. And as it turns out, this design allows for much more compact storage, since all objects having identical content can be shared, no matter where they are.
通常来说, 在文件系统中, 两个内容一样却有不一样的元数据的文件总是会被当作是两个独 立的文件. 为什么会有这种不同呢? 基本上我们可以认为这是因为文件系统主要是为了会 变化的文件设计的, 而 Git 并不是, 我们反而是希望在 Git 中被存下来的快照不会发生 变化的. 实际上这种设计甚至可以用来压缩存储空间, 因为它允许两个有相同内容的文件 共享空间3.
1.2 Introducing the blob | 关于 blob 的二三事
Now that the basic picture has been painted, let’s get into some practical examples. I’m going to start by creating a sample Git repository, and showing how Git works from the bottom up in that repository. Feel free to follow along as you read:
我们已经大致了解了 Git 的工作原理, 现在让我们看一些实践中的案例. 我将创建一个 Git repository 作为例子, 用它来自底向上地展示 Git 是如何工作的. 你完全可以在阅读 的同时也自己动手试试:
$ mkdir sample; cd sample
$ echo 'Hello, world!' > greeting
Here I’ve created a new filesystem directory named “sample” which contains a file whose contents are prosaically predictable. I haven’t even created a repository yet, but already I can start using some of Git’s commands to understand what it’s going to do. First of all, I’d like to know which hash id Git is going to store my greeting text under:
这里我创建了一个叫叫 “sample” 的文件夹, 它的内容是显而易见的. 目前我还没有创建一 个 repository, 但是我实际上已经可以使用一些 Git 命令来简单解释一下接下来我们要 干些啥. 首先, 我想知道一下这个叫 greeting 的文件被使用 Git 进行版本管理之后, 它 对应的那个 blob 的名字是啥:
$ git hash-object greeting
af5626b4a114abcb82d63db7c8082c3c4756e51b
If you run this command on your system, you’ll get the same hash id. Even though we’re creating two different repositories (possibly a world apart, even) our greeting blob in those two repositories will have the same hash id. I could even pull commits from your repository into mine, and Git would realize that we’re tracking the same content — and so would only store one copy of it! Pretty cool.
如果你也在你的机子上跑了这条命令,你一定会和我得到一个同样的哈希值. 虽然我们甚至 可能不在同一个位面4, 在两个不同的 repository 中, 同样的内容还是有同样的哈 希值. 我甚至可以从你的 repository 中 pull 一些 commit 到我这里来, 如果我真的那 么做了, Git 也会认识到我们两个人是在跟踪同样的一个内容 — 所以它也只会存储一份 数据. 这真的很棒!
The next step is to initialize a new repository and commit the file into it. I ’m going to do this all in one step right now, but then come back and do it again in stages so you can see what’s going on underneath:
接下来我们创建一个新的 repository 然后把文件 commit 进去. 我接下来将一次性完成 它, 之后我会再一步步的做一次, 这样有利于你理解到底发生了什么:
$ git init
$ git add greeting
$ git commit -m "Added my greeting"
At this point our blob should be in the system exactly as we expected, using the hash id determined above. As a convenience, Git requires only as many digits of the hash id as are necessary to uniquely identify it within the repository. Usually just six or seven digits is enough:
此时, 我们的那个 blob 应该正如我们预想的那样出现在这个系统中了, 它的哈希值正如上
面所说的那样, 应该是af5626b4a114abcb82d63db7c8082c3c4756e51b. 方便起见, 只要
你给出足以在这个 repository 中唯一确定这个 blob 的哈希值前缀, Git 就可以找到这
样一个 blob. 通常来说六七个字符就够了:
$ git cat-file -t af5626b
blob
$ git cat-file blob af5626b
Hello, world!
There it is! I haven’t even looked at which commit holds it, or what tree it ’s in, but based solely on the contents I was able to assume it’s there, and there it is. It will always have this same identifier, no matter how long the repository lives or where the file within it is stored. These particular contents are now verifiably preserved, forever.
看, 我们已经找到他了, 我甚至都不需要知道是哪个 commit 引用了这个 blob, 也不用知 道这个 blob 在哪个 tree 上, 我们只需要通过文件的内容就足以确定这个 blob 的存在. 这个文件一直都可以以这种方式来唯一确定, 不管这个repository存在了多久, 也不用管这 个 blob 到底被存储在 repository 中的哪里. 这个内容已经被很好的保护了起来.
In this way, a Git blob represents the fundamental data unit in Git. Really, the whole system is about blob management.
Git 以这种方式在 repository 中呈现数据. 讲真, 整个 Git 都只是在管理 blob 而已.
1.3 Blobs are stored in trees | Blob 是存在 tree 里的
The contents of your files are stored in blobs, but those blobs are pretty featureless. They have no name, no structure — they’re just “blobs”, after all.
Git 在追踪文件的过程中, 将你文件里的内容存储在 blob 中, 但是 blob 的功能相当的有 限, 它们没有文件名, 没有结构, 它们只是 “blob”, 仅此而已.
In order for Git to represent the structure and naming of your files, it attaches blobs as leaf nodes within a tree. Now, I can’t discover which tree(s) a blob lives in just by looking at it, since it may have many, many owners. But I know it must live somewhere within the tree held by the commit I just made:
为了能够记录下你文件的名字和结构, Git 将 blob 看作是 tree 的叶子节点来管理. 我们 显然不能通过查看一个 blob 来看出它到底属于哪个 tree, 因为它很可能同时出现在相当 多个 tree 中. 但是我知道它一定存在于哪个我们刚刚创建的 commit 所管理的 tree 中:
$ git ls-tree HEAD
100644 blob af5626b4a114abcb82d63db7c8082c3c4756e51b greeting
There it is! This first commit added my greeting file to the repository. This commit contains one Git tree, which has a single leaf: the greeting content’s blob.
这就是那个 blob 了! 这是我刚提交的那个, 将我的 greeting 文件添加到 repository 中的 commit. 这个 commit 里面有一个 Git tree, 而这个 tree 中只有一个叶子节点 — 那就是存放着 greeting 文件内容的那个 blob.
Although I can look at the tree containing my blob by passing HEAD to
ls-tree, I haven’t yet seen the underlying tree object referenced by that commit. Here are a few other commands to highlight that difference and thus discover my tree:
尽管我可以通过向 ls-tree 这个命令传入 HEAD 来查看那个含有我的 blob 的 tree, 但
是我还没从底层看到过那个被 commit 引用的 tree 对象. 这里有几个命令能说明这两者
有什么不同5, 我们来看看:
$ git rev-parse HEAD
588483b99a46342501d99e3f10630cfc1219ea32 # different on your system

$ git cat-file -t HEAD
commit

$ git cat-file commit HEAD
tree 0563f77d884e4f79ce95117e2d686d7d6e282887
author John Wiegley <[email protected]> 1209512110 -0400
committer John Wiegley <[email protected]> 1209512110 -0400
Added my greeting
The first command decodes the HEAD alias into the commit it references, the second verifies its type, while the third command shows the hash id of the tree held by that commit, as well as the other information stored in the commit object. The hash id for the commit is unique to my repository — because it includes my name and the date when I made the commit — but the hash id for the tree should be common between your example and mine, containing as it does the same blob under the same name.
第一个命令通过 HEAD 找到它所指向的那个 commit, 第二个可以指明 HEAD 指针的类型, 而第三个命令则展示了那个 commit 所管理的 tree 的哈希值, 以及这个 commit 的一些 相关信息. 这个 commit 的哈希值和你的系统中得到的是不同的, 因为如你所见, 一个 commit 中式包含作者和提交时间,还有说明文字等信息的, 这些东西都会加入哈希值的计 算, 所以一定是不同的. 然而 tree 的哈希值却和你的系统中是一样的. 因为我们两的系 统中, 这个 tree 的内容是完全一致的.
Let’s verify that this is indeed the same tree object:
我们来确认一下这个 tree 是真的和你那边相同:
$ git ls-tree 0563f77
100644 blob af5626b4a114abcb82d63db7c8082c3c4756e51b greeting
There you have it: my repository contains a single commit, which references a tree that holds a blob — the blob containing the contents I want to record. There’s one more command I can run to verify that this is indeed the case:
这里你可以看到, 我的 repository 中只包含一个 commit, 这个 commit 它关联到一个 tree, 而这个 tree 管理了一个 blob, 这个 blob 里面是我希望记录下来的内容. 还有一 个命令也能展示这个情况:
$ find .git/objects -type f | sort
.git/objects/05/63f77d884e4f79ce95117e2d686d7d6e282887
.git/objects/58/8483b99a46342501d99e3f10630cfc1219ea32
.git/objects/af/5626b4a114abcb82d63db7c8082c3c4756e51b
From this output I see that the whole of my repo contains three objects, each of whose hash id has appeared in the preceding examples. Let’s take one last look at the types of these objects, just to satisfy curiosity:
在这个命令的输出中可以看到我的整个 repository 中只有三个对象, 每一个的哈希值你都 已经见到过了. 为了满足好奇心, 我们甚至可以看一下他们对应的类型:
$ git cat-file -t 588483b99a46342501d99e3f10630cfc1219ea32
commit
$ git cat-file -t 0563f77d884e4f79ce95117e2d686d7d6e282887
tree
$ git cat-file -t af5626b4a114abcb82d63db7c8082c3c4756e51b
blob
I could have used the show command at this point to view the concise contents of each of these objects, but I’ll leave that as an exercise to the reader.
我本可以使用 show 命令来查看这些对象的内容, 但是我选择将这个留作读者的练习.
1.4 How trees are made | Tree 是怎样炼成的
Every commit holds a single tree, but how are trees made? We know that blobs are created by stuffing the contents of your files into blobs — and that trees own blobs — but we haven’t yet seen how the tree that holds the blob is made, or how that tree gets linked to its parent commit.
每个 commit 对应一个 tree, 但是 tree 是怎样炼成的呢? 我们已经知道了 blob 是基于 你的文件内容创建的数据块, 以及 Git 是用 tree 来管理 blob 的. 但是我们还并不理解 这些管理 blob 用的 tree 是如何被创建的, 或者说我们并不懂 tree 是如何连接到它的 父 commit 的.
Let’s start with a new sample repository again, but this time by doing things manually, so you can get a feeling for exactly what’s happening under the hood:
我们来看上一节中提到的那个例子, 不过这次我们一步一步手动地做这些事情, 这样你可以 明白底层到底发生了什么:
$ rm -fr greeting .git
$ echo 'Hello, world!' > greeting
$ git init
$ git add greeting
It all starts when you first add a file to the index. For now, let’s just say that the index is what you use to initially create blobs out of files. When I added the file
greeting, a change occurred in my repository. I can’t see this change as a commit yet, but here is one way I can tell what happened:
这一切是从你首次将一个文件加入 the index 开始的. 现在让我们先这么认为: the index
是你初次用来将文件内容装填进 blob 时所需要使用的工具.当我添加名为 greeting 的
文件时, 我的 repository 发生了一次修改, 而我目前还不能够将这个更改看作是
commit, 但是我还是有一个方法能够搞清到底发生了什么:
$ git log # this will fail, there are no commits!
fatal: bad default revision 'HEAD'
$ git ls-files --stage # list blob referenced by the index
100644 af5626b4a114abcb82d63db7c8082c3c4756e51b 0 greeting
What’s this? I haven’t committed anything to the repository yet, but already an object has come into being. It has the same hash id I started this whole business with, so I know it represents the contents of my
greetingfile. I could usecat-file -tat this point on the hash id, and I’d see that it was a blob. It is, in fact, the same blob I got the first time I created this sample repository. The same file will always result in the same blob (just in case I haven’t stressed that enough).
那么这是啥呢? 我还没有 commit 过任何东西啊? 但是实际上已经有一个东西在上述的操作
中被生成了出来. 它的哈希值和我们一开始对 greeting 算出来的那个是一样的, 所以
我们可以知道这个东西它里面是文件 greeting 的数据. 此时, 我可以使用命令
cat-file-t 来查看那个哈希值对应的文件, 实际上我们也看过了, 这个文件本身是一个
blob. 实际上它和我们一开始创建的那个 repository 中的那个 blob 是完全一样的东西.
This blob isn’t referenced by a tree yet, nor are there any commits. At the moment it is only referenced from a file named
.git/index, which references the blobs and trees that make up the current index. So now let’s make a tree in the repo for our blob to hang off of:
这个 blob 目前还没有被某个 tree 引用, 实际上也没有被任何一个 commit 引用. 在这个
时候, 实际上只有一个叫 .git/index的文件引用了这个 blob, 这文件里面引用了所有
构成了当前的 index 的 blob 和 tree. 那么我们现在用这个 blob 来创建一个 tree:
$ git write-tree # record the contents of the index in a tree
0563f77d884e4f79ce95117e2d686d7d6e282887
This number should look familiar as well: a tree containing the same blobs (and sub-trees) will always have the same hash id. I don’t have a commit object yet, but now there is a tree object in that repository which holds the blob. The purpose of the low-level
write-treecommand is to take whatever the contents of the index are and tuck them into a new tree for the purpose of creating a commit.
这个值也令人十分熟悉: 两个包含同样的 blob, 或者说 sub-tree 们的 tree 的哈希值总
时一样的. 我的 repository 中到现在还没有一个 commit, 但是已经有一个 tree 了, 这
个 tree 还引用了一个 blob. wirte-tree 这个底层命令的存在, 使得我们可以将任何
在 the index 中的内容装载到一个新的 tree 中, 然后用来创建一个 commit.
I can manually make a new commit object by using this tree directly, which is just what the
commit-treecommand does:
只需要用 commit-tree 命令, 我现在就可以用上面创建的 tree 来手动地创建一个新的
commit 对象, 就像这样:
$ echo "Initial commit" | git commit-tree 0563f77
5f1bc85745dcccce6121494fdd37658cb4ad441f
The raw
commit-treecommand takes a tree’s hash id and makes a commit object to hold it. If I had wanted the commit to have a parent, I would have had to specify the parent commit’s hash id explicitly using the-poption. Also, note here that the hash id differs from what will appear on your system: This is because my commit object refers to both my name, and the date at which I created the commit, and these two details will always be different from yours.
这个 commit-tree 命令需要知道那个 tree 的哈希值, 然后创建一个 commit 来管理它.
如果我想要这个 commit 有一个父 commit, 那我需要使用 -p 参数指定父 commit 的哈
希值. 以及我们可以注意到, 这个 tree 的哈希值和你的系统上的是不同的, 这是因为我
的 commit 中实际上包含了我的名字信息, 以及我创建这个 commit 的日期, 这两个值是
和你的仓库中的情况不同的.
Our work is not done yet, though, since I haven’t registered the commit as the new head of a branch:
活还没完, 我们还没更新这个 commit 对应的分支:
$ echo 5f1bc85745dcccce6121494fdd37658cb4ad441f > .git/refs/heads/master
This command tells Git that the branch name “master” should now refer to our recent commit. Another, much safer way to do this is by using the command
update-ref:
这个命令告诉 Git 该用 “master” 这个名字指代我们新提交的那个 commit 了. 还有一点
要说的就是, 完成上面这件事情还有一个更安全的方法, 那就是使用 update-ref 命令:
$ git update-ref refs/heads/master 5f1bc857
After creating
master, we must associate our working tree with it. Normally this happens for you whenever you check out a branch:
在创建6完 master 之后,我们必须将我们的 working tree 调整成和 master 相匹配 的样子. 一般来说, 这个操作是用于 check out 一个分支的:
$ git symbolic-ref HEAD refs/heads/master
This command associates HEAD symbolically with the master branch. This is significant because any future commits from the working tree will now automatically update the value of
refs/heads/master.
这个命令会将 HEAD 绑定到 master 分支上. 这一点是相当自然的, 因为我们接下来再从
working tree 中做出更改之后提交的 commit 应该要更新这个名叫 master 的分支, 也就
是文件 refs/heads/master 的值.
It’s hard to believe it’s this simple, but yes, I can now use log to view my newly minted commit:
虽然很难相信, 但是 Git 的工作就是如此简单, 我还可以使用 log 命令来查看我刚一步步 手动添加的这个 commit:
$ git log
commit 5f1bc85745dcccce6121494fdd37658cb4ad441f
Author: John Wiegley <[email protected]>
Date:   Mon Apr 14 11:14:58 2008 -0400
        Initial commit
A side note: if I hadn’t set
refs/heads/masterto point to the new commit, it would have been considered “unreachable”, since nothing currently refers to it nor is it the parent of a reachable commit. When this is the case, the commit object will at some point be removed from the repository, along with its tree and all its blobs. (This happens automatically by a command calledgc, which you rarely need to use manually). By linking the commit to a name withinrefs/heads, as we did above, it becomes a reachable commit, which ensures that it’s kept around from now on.
这里有个值得注意的地方: 如果我不曾将文件 refs/heads/master 指向那个新的
commit, 这个 commit 会被看作是 “不可达的”, 因为没有任何其他的东西和他有关联, 它
也不是任何一个可达的 commit 的祖先. 当发生这种情况的时候, 这个 commit 将会被
Git 在某个时候从 repository 中移除, 它对应的 tree 和 blob 也一样, (这个事情会在
运行一个叫 gc 的命令的时候自动地发生, 当然这个命令基本不会被用户手动运行). 如
果我们像上面做的那样, 在目录 .git/heads 下用某个名字关联到这个 commit, 这个
commit 就是可达的了, 这可以保证它不会被删掉.
1.5 The beauty of commits | Commit 之美
Some version control systems make “branchCes” into magical things, often distinguishing them from the “main line” or “trunk”, while others discuss the concept as though it were very different from commits. But in Git there are no branches as separate entities: there are only blobs, trees and commits. Since a commit can have one or more parents, and those commits can have parents, this is what allows a single commit to be treated like a branch: because it knows the whole history that led up to it.
一些版本控制系统将 branch 弄得很晦涩难懂, 经常将 “主线” (或者说 “主干” ), 和 “分 支” 区分开来, 而另一些版本控制系统则认为分支这个概念和 commit 有很大区别. 但是 在 Git 中并没有 branch 这个实体: Git 里只有 blob, tree 以及 commit 这三个概念. 因为一个 commit 可以有多个父 commit 而这些父 commit 也有父亲, 所以我们实际上可 以把单个 commit 当作 branch 来看待: 因为我们实际上可以从这个 commit 开始, 回溯 出文件内容是如何一步步地被修改, 更迭到当前这个 commit 的这整个历史.
You can examine all the top-level, referenced commits at any time using the
branchcommand:
你随时都可以通过 branch 命令查看所有顶层的, 被引用的 commit :
$ git branch -v
* master 5f1bc85 Initial commit
Say it with me: A branch is nothing more than a named reference to a commit. In this way, branches and tags are identical, with the sole exception that tags can have their own descriptions, just like the commits they reference. Branches are just names, but tags are descriptive, well, “tags”.
来跟着我一起念: “一个 branch 仅仅只是一个 commit 的引用, 只是这个引用本身还有一 个名字罢了.” 从这种角度来看, branch 和 tags 几乎没有什么区别, 只有一个例外: tag 就像它指向的那个 commit 一样还可以拥有自己的说明性文字. branch 只是 commit 的名 字, 但是 tag 是描述性的, 毕竟人家是 “标签” 嘛.
But the fact is, we don’t really need to use aliases at all. For example, if I wanted to, I could reference everything in the repository using only the hash ids of its commits. Here’s me being straight up loco and resetting the head of my working tree to a particular commit:
但是实际上我们也可以完全就不用这些别名. 比如说, 如果我想的话, 我实际上可以用 repository 中任何一个 commit 的哈希值来唯一地确定它. 下面这个是如果我想直接把我 的 working tree 对应的 HEAD 指向某个特定的 commit 需要用的命令:
$ git reset --hard 5f1bc85
The –hard option says to erase all changes currently in my working tree, whether they’ve been registered for a checkin or not (more will be said about this command later). A safer way to do the same thing is by using
checkout:
这个 --hard 选项的意思就是说, 让 Git 不管我当前的 working tree 中相对于给定的
commit 发生的所有更改是否有被记录下来过, 都把它们清除掉. 我们以后还会聊聊
reset 这个命令. 完成这件事情还有一个更安全的方式, 那就是使用 checkout 命令:
$ git checkout 5f1bc85
The difference here is that changed files in my working tree are preserved. If I pass the
-foption tocheckout, it acts the same in this case toreset --hard, except that checkout only ever changes the working tree, whereasreset --hardchanges the current branch’s HEAD to reference the specified version of the tree.
这两者的区别在于, 后者对于我的 working tree 中的文件修改操作是有一定保护的, 对于
没记录过的数据会做一次是否清除的询问. 如果我们将参数 -f 传递给 checkout命
令, Git 的行为就会几乎和执行 reset --hard 时一模一样. 它们两之间的区别在于
checkout 命令只是清除 working tree 中的文件变化, 而 reset --hard 会将当前的
HEAD 指向的那个 branch 一起移动到某个版本的 tree 上.
Another joy of the commit-based system is that you can rephrase even the most complicated version control terminology using a single vocabulary. For example, if a commit has multiple parents, it’s a “merge commit” — since it merged multiple commits into one. Or, if a commit has multiple children, it represents the ancestor of a “branch”, etc. But really there is no difference between these things to Git: to it, the world is simply a collection of commit objects, each of which holds a tree that references other trees and blobs, which store your data. Anything more complicated than this is simply a device of nomenclature.
另一个使用基于 commit 的版本控制系统带来的乐趣是你可以用很简单的话语来描述版本控 制系统中那些晦涩难懂的术语. 比方说, 如果一个 commit 拥有两个父 commit, 那么我们 称这个 commit 是一个 “merge commit” — 因为它确实将多个 commit 合并了起来嘛.还 有,如果一个 commit 拥有多个子 commit 这代表着这里是分支的开始, 诸如此类. 但是实 际上这些术语所描述的事情对于 Git 来说并没有什么区别: 对于 Git 来说, 整个世界就 是由 commit 对象组成的, 它们管理着一个 tree 而这个 tree 中又引用了 其他的 tree 以及 blob, 在 blob 中实际存放着你的数据. 其他比这个复杂的东西都只是其他人对某个 行为取的名字罢了.
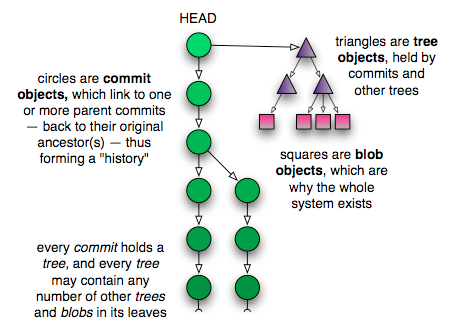
Here is a picture of how all these pieces fit together:
这里有一张关于上面提到的种种对象之间的关系的图,也许可以帮助你的理解:
1.6 A commit by any other name… | Commit 的名字
Understanding commits is the key to grokking Git. You’ll know you have reached the Zen plateau of branching wisdom when your mind contains only commit topologies, leaving behind the confusion of branches, tags, local and remote repositories, etc. Hopefully such understanding will not require lopping off your arm — although I can appreciate if you’ve considered it by now.
对 commit 的理解对于弄懂 Git 来说非常关键. 当你抛弃了那些令人困惑的什么 branch, tag, 本地的以及远程 repository 之后, 当你的头脑中只剩下了 commit 相关的拓扑结构 的时候, 你将会对 “分支” 的智慧有崭新的理解. 想过去这种对 commit 的理解对于你来 不会是什么很困难的事情, 如果你现在就能开始试图理解 commit 我会很开心.
If commits are the key, how you name commits is the doorway to mastery. There are many, many ways to name commits, ranges of commits, and even some of the objects held by commits, which are accepted by most of the Git commands. Here ’s a summary of some of the more basic usages:
如果说 commit 是关键, 那么如何给 commit 命名就是理解 Git 的门道所在. 实际上有很 多很多给 commit 命名的方式, 甚至连一次性给某个范围内的 commit 命名, 乃至于给一 些由 commit 管理的对象命名, 都是可以办到的. 大部分的 Git 命令都支持这种操作. 这 里有一些你需要知道的用法总结:
- branchname — As has been said before, the name of any branch is simply an alias for the most recent commit on that “branch”. This is the same as using the word HEAD whenever that branch is checked out.
- branchname — 就像之前说的那样, branch 的名字只是那个 “分支” 上最新的一个 commit 的别名. 这和你使用单词 HEAD 来表示当前 check out 的那个 branch 是一样 的.
- tagname — A tag-name alias is identical to a branch alias in terms of naming a commit. The major difference between the two is that tag aliases never change, whereas branch aliases change each time a new commit is checked in to that branch.
- tagname — 从给 commit 命名的角度来看, 一个 tag 几乎和一个 branch 是一模一 样的. 主要的区别在于 branch 指代的 commit 是可能会变化的, 它会在新的 commit 提交到这个 branch 的时候被更新成新的那个, 而 tag 不会.
- HEAD — The currently checked out commit is always called HEAD. If you check out a specific commit — instead of a branch name — then HEAD refers to that commit only and not to any branch. Note that this case is somewhat special, and is called “using a detached HEAD” (I’m sure there’s a joke to be told here…).
- HEAD — 当前 check out 的那个 commit 被称作 HEAD. 如果你 check out 了一个 特定的 commit — 而不是一个 branch 的话 — 那么 HEAD 就只是指向了那个 commit 而已, 并没有指向任何一个 branch. 需要注意的是这是一种特殊的情况, 我们称这种情 况为 HEAD 指针的脱离.
- c82a22c39cbc32… — A commit may always be referenced using its full, 40-character SHA1 hash id. Usually this happens during cut-and-pasting, since there are typically other, more convenient ways to refer to the same commit.
- c82a22c — You only need use as many digits of a hash id as are needed for a unique reference within the repository. Most of the time, six or seven digits is enough.
- c82a22c39cbc32… — 我们总是可以通过一个 commit 的那个由四十个字符组成的 SHA1 哈希值来找到它. 通常这种事情发生在你需要复制粘贴的时候, 因为在其他情况下, 几乎都有更方便的方式来找到它.
- c82a22c — 其实你只需要给出足够在当前的 repository 中唯一确定一个 commit 的哈希值的前缀就足以找到那个 commit 了, 一般来说是 6 到 7 位左右.
- name^ — The parent of any commit is referenced using the caret symbol. If a commit has more than one parent, the first is used.
- name^^ — Carets may be applied successively. This alias refers to “the parent of the parent” of the given commit name.
- name^2 — If a commit has multiple parents (such as a merge commit), you can refer to the nth parent using
name^n.- name~10 — A commit’s nth generation ancestor may be referenced using a tilde (~) followed by the ordinal number. This type of usage is common with
rebase -i, for example, to mean “show me a bunch of recent commits”. This is the same as name^^^^^^^^^^.- name:path — To reference a certain file within a commit’s content tree, specify that file’s name after a colon. This is helpful with show, or to show the difference between two versions of a committed file:
接下来的几条中的 “name” 可以使用上文提到的所有可以找到 commit 的字符串替换, 以下 是一些相对某个 commit 查询另一个 commit 的方法:
- name^ —
^这个符号可以找到一个 commit 的父 commit, 如果这个 commit 有多 个父 commit 那么查询的结果是第一个7.
- name^^ —
^这个符号是可以被连续的调用的8, 这意味着你寻找的是当前 commit 的爷爷.
- name^2 — 如果一个 commit 有多个父 commit — 比方说一个 merge commit — 那
么如果你想找其中的第 n 个父 commit, 可以使用
name^n. - name~10 — 这意味着一个 commit 十代之前的那个祖宗, 第 n 代祖先,可以通过一
个
~符号后面跟着一个数字来找到. 这一般是用于执行rebase -i命令的时候用 的. 效果和 name^^^^^^^^^^ 是完全一致的. - name:path — 你可以用这种方式来从一个 commit 中根据路径来找到 tree 中的某 个特定文件. 一般来说这个功能在你想比较两个 commit 之间某个文件的差异的时候比 较有用, 比如像下面这样:
$ git diff HEAD^1:Makefile HEAD^2:Makefile
- name^{tree} — You can reference just the tree held by a commit, rather than the commit itself.
- name^{tree} — 上面说的都是找到某个 commit 的方法, 而你可以通过这个方式来 指定一个 commit 管理的那个 tree.
- name1..name2 — This and the following aliases indicate commit ranges, which are supremely useful with commands like log for seeing what’s happened during a particular span of time. The syntax to the left refers to all the commits reachable from name2 back to, but not including, name1. If either name1 or name2 is omitted, HEAD is used in its place.
- name1…name2 — A “triple-dot” range is quite different from the two-dot version above. For commands like log, it refers to all the commits referenced by name1 or name2, but not by both. The result is then a list of all the unique commits in both branches. For commands like
diff, the range expressed is between name2 and the common ancestor of name1 and name2. This differs from thelogcase in that changes introduced by name1 are not shown.- master.. — This usage is equivalent to “
master..HEAD”. I’m adding it here, even though it’s been implied above, because I use this kind of alias constantly when reviewing changes made to the current branch.- ..master — This, too, is especially useful after you’ve done a
fetchand you want to see what changes have occurred since your lastrebaseormerge.- –since=“2 weeks ago” — Refers to all commits since a certain date.
- –until=”1 week ago” — Refers to all commits before a certain date.
- –grep=pattern — Refers to all commits whose commit message matches the regular expression pattern.
- –committer=pattern — Refers to all commits whose committer matches the pattern.
- –author=pattern — Refers to all commits whose author matches the pattern. The author of a commit is the one who created the changes it represents. For local development this is always the same as the committer, but when patches are being sent by e-mail, the author and the committer usually differ.
- –no-merges — Refers to all commits in the range that have only one parent — that is, it ignores all merge commits.
以下都是一个范围内的 commit 的别名, 通常来说, 在调用 log 命令来查看过去的某段时 间内, 代码到底发生了什么变化的时候非常的有用:
-
name1..name2 — 这意味着你选中了在树上遍历时, 从 name2 出发, 在遍历到 name1 之前所有可以遍历到的 commit, 当然是不包括 name1 的.如果你在 name1 或者 name2 的位置什么都没写, 那么意味着你希望在相应位置使用 HEAD 来代替 name1/name2.
- master.. — 这样可以选中 master 到 HEAD 的所有 commit, 一般来说, 在查看 dev 比 master 快了多少的时候比较有用.
- ..master — 这个通常用于: 在你完成了一次 fetch 之后, 想查看自己本地的 master 在上一次 rebase 或者是 merge 之后在远程仓库中被做了什么样的修改.
-
name1…name2 — 中间有三个点的范围和上面说的只有两个点的有很大的差异. 对 于
log这类的命令, 三个点的范围选中了所有被 name1 或者 name2 其中之一直接或 者间接引用的所有 commit, 注意: 并不包括两者同时引用的 commit. 结果上来说, 这 意味着你找到了一系这两个分支并不共同拥有的 commit. 而对于像diff这样的指令 而言, 这样会选中从 name2 到 name1 和 name2 的最近公共祖先之间的所有 commit.differ和log的区别实际上在于, 从 LCA 到 name1 这条路径上的 commit 并不会 被选中. -
–since=“2 weeks ago” — 这样可以选中某个特定日期之后的所有 commit.
-
–until=”1 week ago” — 与上一条类似, 选中某个特定日期之前的所有 commit.
-
–grep=pattern — 选中所有在 commit message 中有和 pattern 匹配的内容的 commit.
-
–committer=pattern — 选中所有提交者名字和 pattern 相匹配的 commit.
-
–author=pattern — 选中所有作者名字和 pattern 相匹配的 commit. 作者和提交 者是有区别的, 作者是指实际上对目录中的内容做出更改的那个人, 而提交者是将这个 更改加入到 repository 中的人. 对于本地仓库来说, 作者和提交者总是一样的, 但是 比如说某些更改是通过邮件发送的, 那么作者和提交者往往是不同的.
-
–no-merges — 顾名思义, 是指选中所有只有一个父 commit 的 commit, 即将所有 merge commit 排除在外.
Most of these options can be mixed-and-matched. Here is an example which shows the following log entries: changes made to the current branch (branched from master), by myself, within the last month, which contain the text “foo”:
这些选项通常都可以混合使用. 下面这个例子是我选中在当前分支 (这是一个比 master 更 快的分支, 比如 dev 分支) 中由我在过去一个月内写的, 并且还在 commit message 中含 有 “foo” 的所有 commit:
$ git log --grep='foo' --author='johnw' --since="1 month ago" master..
1.7 Branching and the power of rebase | 分支, 以及 rebase 的力量
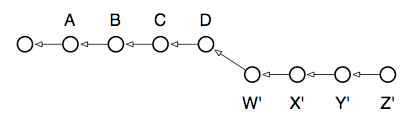
One of Git’s most capable commands for manipulating commits is the innocently-named rebase command. Basically, every branch you work from has one or more “base commits”: the commits that branch was born from. Take the following typical scenario, for example. Note that the arrows point back in time because each commit references its parent(s), but not its children. Therefore, the D and Z commits represent the heads of their respective branches:
Git 最好用的命令之一就是操作 commit 的 rebase 命令, 顾名思义, rebase 是用来更改
commit 的 base 的. 通常来说, 你的每个分支都会有一个或者是更多个的 “base
commits”: 指你的分支是从哪个 commit 开始创建的. 以下面这张图描述的这种典型情况为
例, 我们可以注意到箭头是指向父 commit 的, 而不是指向子 commit, 因为实际上是子
commit 中含有对父 commit 的引用. 我们通常将 D 和 Z 视作它们所在分支的 HEAD:
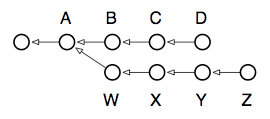
In this case, running branch would show two “heads”:
DandZ, with the common parent of both branches being A. The output of show-branch shows us just this information:
在如上图所示的这个情况中, 我们可以看到这些分支一共有两个 “HEAD": D 和 Z,
它们的公共祖先是 A. show-branch 指令的输出结果向我们展示了这一点:
$ git branch
  Z
* D

$ git show-branch
! [Z] Z
 * [D] D
--
 * [D] D
 * [D^] C
 * [D~2] B
+  [Z]Z
+  [Z^]Y
+  [Z~2] X
+  [Z~3] W
+* [D~3] A
Reading this output takes a little getting used to, but essentially it’s no different from the diagram above. Here’s what it tells us:
阅读这个输出需要我们花一点时间来习惯它, 但是它实际上给出的信息和上面那张示意图没 有什么区别. 以下是这个输出的阅读方法9:
- The branch we’re on experienced its first divergence at commit
A(also known as commitD~3, and evenZ~4if you feel so inclined). The syntaxcommit^is used to refer to the parent of a commit, whilecommit~3refers to its third parent, or great-grandparent.- Reading from bottom to top, the first column (the plus signs) shows a divergent branch named
Zwith four commits:W,X,YandZ.- The second column (the asterisks) show the commits which happened on the current branch, namely three commits:
B,CandD.- The top of the output, separated from the bottom by a dividing line, identifies the branches displayed, which column their commits are labelled by, and the character used for the labeling.
- 我们目前在 repository 中拥有的两个分支是从
A开始分支的. - 从下往上读,第一列字符 (一列
+) 告诉我们, 分支Z在分叉后拥有的 commit 依次 是:W,X,Y还有Z. - 同样, 第二列字符 (一列
*) 告诉我们, 分支D在分叉后拥有的 commit 依次是:B,C还有D. - 在整个输出的最上面有一些被
--分开的部分, 这里是在告诉我们分支的HEAD是 谁, 以及下面的一系列输出中, 开头的第几列是和这个分支对应的, 使用*标注的分 支是当前 checkout 的, 其他的分支HEAD使用!, 而在接下来的部分中使用+.
The action we’d like to perform is to bring the working branch
Zback up to speed with the main branch,D. In other words, we want to incorporate the work fromB,C, andDintoZ.
我们接下来想做的事情是把分支 Z 并入主分支 D. 换句话说, 我们希望把B, C 以
及 D 做出的更改也写进 Z.
In other version control systems this sort of thing can only be done using a “branch merge”. In fact, a branch merge can still be done in Git, using
merge, and remains needful in the case whereZis a published branch and we don’t want to alter its commit history. Here are the commands to run:
在其他的版本控制系统中, 这是一件只能通过 “分支合并” 操作完成的事情. 而实际上所谓
的分支合并在 Git 中也是可以被完成的, 只要使用 merge 命令就可以了, 如果我们不
想更改 Z 的 commit 历史, 那么我们可以运行这些命令:
$ git checkout Z # switch to the Z branch
$ git merge D # merge commits B, C and D into Z
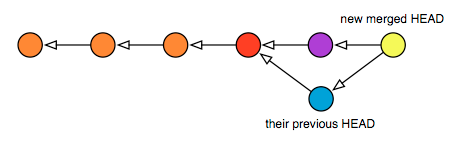
This is what the repository looks like afterward:
运行完了以后你的 repository 看起来会像是下面图中的这样:
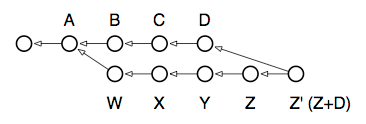
If we checked out the
Zbranch now, it would contain the contents of the previousZ(now referenceable asZ^), merged with the contents ofD. (Though note: a real merge operation would have required resolving any conflicts between the states ofDandZ).
如果我现在检出分支 Z, 注意 “分支 Z” 只是一个 commit 的别名, 它曾经指 commit
Z, 而现在它是图中的 Z', 分支 Z (现在指代 commit Z) 现在会包含 commit Z
和 commit D 合并过后的内容. 当然, 要进行一个 merge 操作需要先处理所有 D
和 Z 之间的冲突.
Although the new
Znow contains the changes fromD, it also includes a new commit to represent the merging ofZwithD: the commit now shown asZ ’. This commit doesn’t add anything new, but represents the work done to bringDandZtogether. In a sense it’s a “meta-commit”, because its contents are related to work done solely in the repository, and not to new work done in the working tree.
在新的 Z 现在包含了 D 中做出的更改的同时, 在新 Z 中同样存在着一个新的
commit, 这个 commit 是用来合并 Z 和 D 的: 就是上图中的 Z'. 这个 commit
很可能没有添加任何新的更改, 只是意味着做了一些工作将 D 和 Z 合并到了一起.
某种意义上来说, 这算是一种 “meta-commit”, 因为它的内容只是对 repository 的更改,
而不是对 working tree 的更改.
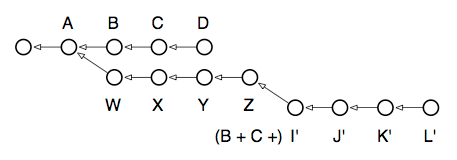
There is a way, however, to transplant the
Zbranch straight ontoD, effectively moving it forward in time: by using the powerful rebase command. Here’s the graph we’re aiming for:
实际上还有一种办法能直接将分支 Z 移植到 D 上, 通过 rebase 命令, 可以直接把
D 快进. 如下图所示:
This state of affairs most directly represents what we’d like done: for our local, development branch
Zto be based on the latest work in the main branchD. That’s why the command is called “rebase”, because it changes the base commit of the branch it’s run from. If you run it repeatedly, you can carry forward a set of patches indefinitely, always staying up-to-date with the main branch, but without adding unnecessary merge commits to your development branch. Here are the commands to run, compared to the merge operation performed above:
我们可以这样来描述我们实际上想干啥: 我们直接把我们在本地进行开发的分支 Z 的
“base commit” 改成了 D. 这正是上问提到的 rebase 命令为什么会被称作 “rebase”.
如果你不停地运行这个命令, 就可以在没有额外的 merge commit 的情况下更新主分支的数
据. 以下是运行 rebase 需要的指令:
$ git checkout Z # switch to the Z branch
$ git rebase D # change Z’s base commit to point to D
Why is this only for local branches? Because every time you rebase, you’re potentially changing every commit in the branch. Earlier, when
Wwas based onA, it contained only the changes needed to transformAintoW. After running rebase, however,Wwill be rewritten to contain the changes necessary to transformDintoW’. Even the transformation fromWtoXis changed, becauseA+W+Xis nowD+W’+X’— and so on. If this were a branch whose changes are seen by other people, and any of your downstream consumers had created their own local branches off ofZ, their branches would now point to the oldZ, not the newZ’.
为什么我们说这种操作只能对本地分支进行呢? 这是因为每当运行 rebase 命令的时候,
我们实际上将分支中的每一个 commit 都进行了更改. 之前的 W 是基于 A 做出的修
改, 如果我们认为一个 commit 中只包含更改的信息的话10, 那么 W 实际上只含
有 “从 A 变成 W” 做出的变化. 但是运行完 rebase 之后, W 实际上就包含了从
D 变成 W' 产生的变化. 以及 W 和 X 之间的更改都产生了改变, 因为原来的
A+W+X 现在是 D+W'+X' — 其他的 commit 也有类似的变化. 如果这样的一个分支中的
更改对于其他人来说是可见的, 以及从你的 repository 中获得源代码的下游人员中有人
用原来的 Z 创建了新的分支, 那么他们的 Z 并不会指向 rebase 后的那个新 Z.
Generally, the following rule of thumb can be used: Use rebase if you have a local branch with no other branches that have branched off from it, and use merge for all other cases. merge is also useful when you’re ready to pull your local branch’s changes back into the main branch.
通常来说, 以下的经验法则是很有用的: 只要一个本地分支上没有再分出其他的分支, 那么
我们就使用 rebase 命令来合并分支, 其他的情况一律使用 merge. merge 这个命
令在你想把你的本地分支合并进主分支的时候很有用.
1.8 Interactive rebasing | 交互式的 rebase 命令
When rebase was run above, it automatically rewrote all the commits from
WtoZin order to rebase theZbranch onto theDcommit (i.e., the head commit of theDbranch). You can, however, take complete control over how this rewriting is done. If you supply the-ioption torebase, it will pop you into an editing buffer where you can choose what should be done for every commit in the localZbranch:
就像上面说的那样, 当你运行一个 rebase 命令的时候, 它将为了将 Z 分支的 base 更
改到分支 D 的 HEAD 上, 而自动的重写从 W 到 Z 的所有 commit. 其实你是完
全可以控制这个重写的过程的. 给 rebase 传递一个 -i 参数, 那么你将进入一个可
编辑的缓冲区, 在这个界面里, 你可以选择到底应该对 Z 分支上的每个 commit 做些什
么:
- pick — This is the default behavior chosen for every commit in the branch if you don’t use interactive mode. It means that the commit in question should be applied to its (now rewritten) parent commit. For every commit that involves conflicts, the
rebasecommand gives you an opportunity to resolve them.
- pick — 这是如果你不使用交互模式的时候会执行的默认操作, 它意味着你选中了这 个分支中的每一个 commit, 也就是说: 每一个分支上的 commit 都将更改自己的父 commit 到它被重写过的父 commit 上. 对于每个可能产生冲突的 commit, 你会有机会解 决它们.
- squash — A squashed commit will have its contents “folded” into the contents of the commit preceding it. This can be done any number of times. If you took the example branch above and squashed all of its commits (except the first, which must be a pick in order to squash), you would end up with a new
Zbranch containing only one commit on top ofD. Useful if you have changes spread over multiple commits, but you’d like the history rewritten to show them all as a single commit.
- squash — 一个被 “压扁” 的 commit 将会将它之中的更改 “折叠” 进它的新父
commit 里. 这个操作可以不限次数地进行. 如果你对上面说的那个例子, 将除了第一个
commit 以外 (为了进行 squash 需要先进行一个 pick) 的所有 commit “压
扁”, 那么你将会将分支
D中的所有更改折叠成一个 commit, 然后将这个 commit 应 用在分支Z上. 如果你不想保留更改历史, 只想留下一个 commit 的话, 这个模式还 挺好用的.
edit — If you mark a commit as edit, the rebasing process will stop at that commit and leave you at the shell with the current working tree set to reflect that commit. The index will have all the commit’s changes registered for inclusion when you run
commit. You can thus make whatever changes you like: amend a change, undo a change, etc.; and after committing, and runningrebase --continue, the commit will be rewritten as if those changes had been made originally.
- edit — 如果你将一个 commit 标记为了 edit 模式, 那么这个 rebase 命令将
在这个 commit 这里停下来, 然后让你在你的 working tree 中编辑文件, 你可以重做
一次这个 commit 做过的修改. 随后你运行
commit命令的时候, the index 中将会 含有所有已经提交的更改. 你可能会在类似以下的情况下使用这个模式: 添加一个更改 到这个 commit 中, 或者说撤销一个更改. 在你提交 commit 之后, 运行rebase --continue, 那个被标记为 edit 的 commit 将会被你新编辑的这个 commit 代替.
- (drop) — If you remove a commit from the interactive rebase file, or if you comment it out, the commit will simply disappear as if it had never been checked in. Note that this can cause merge conflicts if any of the later commits in the branch depended on those changes.
- (drop) — 如果你打算删除一个 commit. 这个 commit 将会像是从来没有被记录过 一样不复存在. 注意:如果后续的其他 commit 是基于这个 commit 的更改的, 那么这个 操作很可能引起合并冲突.
The power of this command is hard to appreciate at first, but it grants you virtually unlimited control over the shape of any branch. You can use it to:
交互式的 rebase 命令的用处很难一下子说清, 但是这个命令让你有了几乎不受限制的能 力, 来对任何分支做出任何形式的调整. 你实际上可以用这个命令来:
- Collapse multiple commits into single ones.
- Re-order commits.
- Remove incorrect changes you now regret.
- Move the base of your branch onto any other commit in the repository.
- Modify a single commit, to amend a change long after the fact.
- 将多个 commit 折叠成一个.
- 重新调整 commit 的顺序.
- 将不正确的更改删除.
- 将你的分支的 base 移动到你的 repository 中的任何一个 commit 上.
- 更改一个单独的 commit, 比如说在实际上这个 commit 已经被提交很久之后, 往里面添 加更改.
I recommend reading the man page for
rebaseat this point, as it contains several good examples how the true power of this beast may be unleashed. To give you one last taste of how potent a tool this is, consider the following scenario and what you’d do if one day you wanted to migrate the secondary branchLto become the new head ofZ:
我在这里十分建议读者阅读一下 rebase 的帮助页面. 其中有几个可以帮助你理解这个强
大命令的能力到底应该被如果使用的优秀例子. 为了让读者至少对这个工具到底有多屌有
一点点的认识, 我们来看一下下面这个例子:

如果你打算将分支 L 迁移到分支 Z 上, 并且使得 commit L 是分支 Z 的新
HEAD, 你会怎么做呢?
The picture reads: we have our main-line of development,
D, which three commits ago was branched to begin speculative development onZ. At some point in the middle of all this, back whenCandXwere the heads of their respective branches, we decided to begin another speculation which finally producedL. Now we’ve found thatL’s code is good, but not quite good enough to merge back over to the main-line, so we decide to move those changes over to the development branchZ, making it look as though we’d done them all on one branch after all. Oh, and while we’re at it, we want to editJreal quick to change the copyright date, since we forgot it was 2008 when we made the change! Here are the commands needed to untangle this knot:
这个图实际上在说: 我们主要的开发发生在分支 D 上, 而这个分支 D 在三个 commit
之前, 分支出了一个 Z 来进行试探性质的开发. 在 C 和 X 还是分支的 HEAD 的
时候, 有人尝试合并了两个分支, 进行了新一轮的试探性开发, 最终产出了分支 L. 那
么现在我们知道了 commit L 的代码是很优秀的, 但是还没有优秀到足以合并回主分支
的程度, 我们为了进一步改进这个代码, 希望把 L 上的更改移动到分支 Z 上, 然后
调整得足够好了以后, 再合并回主分支. 顺便, 我们在做这一切的同时, 还希望编辑一下
commit J 来简单的变更一下版权信息的日期, 因为当初提交 commit J 的时候忘了改
它. 那么以下是解决以上这些麻烦的问题所需要的命令:
$ git checkout L
$ git rebase -i Z
After resolving whatever conflicts emerge, I now have this repository:
处理完冲突以后, 我的 repository 看起来像下图这样:
As you can see, when it comes to local development, rebasing gives you unlimited control over how your commits appear in the repository.
就像你看到的那样, 如果只是本地开发, rebase 让你几乎有了对 commit 完全的控制能力, 你想让他们是什么样子就可以是什么样子.
2 The Index
2.1 The Index: Meet the middle man | The Index : 中间人
Between your data files, which are stored on the filesystem, and your Git blobs, which are stored in the repository, there stands a somewhat strange entity: the Git index. Part of what makes this beast hard to understand is that it’s got a rather unfortunate name. It’s an index in the sense that it refers to the set of newly created trees and blobs which you created by running add. These new objects will soon get bound into a new tree for the purpose of committing to your repository — but until then, they are only referenced by the index. That means that if you unregister a change from the index with reset, you’ll end up with an orphaned blob that will get deleted at some point at the future.
在你存储在文件系统中的数据文件, 与 Git 中存储的 blob 之间还存在着一个奇怪的媒介, 我们称之为 the Git index. 这个令人困惑的名字使得它很难被人理解. 从某种意义上来 讲, 它确实是一种索引: 它引用一个由新添加的 tree11 和 blob 组成的集合, 这个 集合是用户通过运行 add 命令创建的. 在这些对象真正被添加到一个 tree, 并且最终成 为一个 commit 加入到你的 repository 中之前, 这些新的对象, 它们仅仅只被 the index 引用而已. 这意味着如果你通过 reset 命令将一个被记录到 the index 中的更改撤 销掉的话, 那么你原本新创建的 blob 会成为没有人引用的孤儿, 这种 blob 在未来的某 个时间点会被删除.
The index is really just a staging area for your next commit, and there’s a good reason why it exists: it supports a model of development that may be foreign to users of CVS or Subversion, but which is all too familiar to Darcs users: the ability to build up your next commit in stages.
The index 实际上起到的作用只是一个为你的下一个 commit 而设立的暂存区罢了. 它使得 你有了在一个暂存区里搭建你的下一个 commit 的能力, 这种开发方式对于 Darcs 的用户 来说相对熟悉, 而对于 CVS 或者是 Subversion 的用户来说这可能会很陌生.
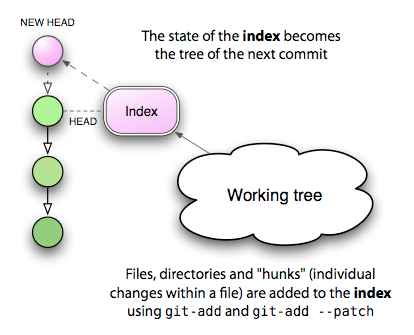
First, let me say that there is a way to ignore the index almost entirely: by passing the
-aflag to commit. Look at the way Subversion works, for example. When you typesvn status, what you’ll see is a list of actions to be applied to your repository on the next call tosvn commit. In a way, this “list of next actions” is a kind of informal index, determined by comparing the state of your working tree with the state of HEAD. If the filefoo.chas been changed, on your next commit those changes will be saved. If an unknown file has a question mark next to it, it will be ignored; but a new file which has been added withsvn addwill get added to the repository.
首先, 实际上是有一种办法能几乎忽略掉 the index 的方法的: 只要在使用 commit 命令
的时候传递 -a 这个参数, 就可以了. 我们以 Subversion 的工作方式为例. 我们输入
svn status, 这个命令的输出是一个关于你的下一个 svn commit 命令将对于你的
repository 做出怎样的更改的列表. 在这个例子中, 那个列表可以看作是 Git 中的 the
index, 毕竟这个通过比较你当前 working tree 和 HEAD 之间的状态差异而得到的列表,
从某种程度上来说是一种信息的索引. 比方说如果文件 foo.c 被更改了, 那么就会出现
在这个列表中, 这意味着你的下一个 commit 会将这个更改写入你的 repository 中. 如
果一个文件的后面有一个 ?, 那么意味着这个文件将被版本管理系统忽略; 但是如果通
过 snv add 将文件添加进管理, 那么这个文件将被加入到 repository 中.
This is no different from what happens if you use
commit -a: new, unknown files are ignored, but new files which have been added with add are added to the repository, as are any changes to existing files. This interaction is nearly identical with the Subversion way of doing things.
实际上当你在 Git 中使用 commit -a 命令的时候, 发生的事情几乎和上面描述的一致:
新建的文件需要使用 add 手动添加, 否则就像被忽略的文件一样, 并不会被添加进
repository. 而以前添加过的文件中的更改则会被加入 repository. 这个交互方式几乎和
Subversion 没有什么区别.
The real difference is that in the Subversion case, your “list of next actions” is always determined by looking at the current working tree. In Git, the “list of next actions” is the contents of the index, which represents what will become the next state of HEAD, and that you can manipulate directly before executing
commit. This gives you an extra layer of control over what ’s going to happen, by allowing you to stage those changes in advance.
这两者之间的区别实际上在于, 在 Subversion 中, 那个列表总是通过检查你的当前工作区 来列出的. 而在 Git 中, 这个列表的功能, 由 the index 中记录的内容来承担. 这个 the index 中指示着 HEAD 这个 commit 接下来会是什么样的状态, 而你可以在 commit 之 前直接对 the index 做出调整. 这实际上让你对更改的控制能力变得更强了.
If this isn’t clear yet, consider the following example: you have a trusty source file,
foo.c, and you’ve made two sets of unrelated changes to it. What you’d like to do is to tease apart these changes into two different commits, each with its own description. Here’s how you’d do this in Subversion:
如果上面这种说法还不够明确. 那么我们可以考虑一下下面这个例子: 你有一个可以信任的
源文件, 它是 foo.c, 你还有对他做出了两组没什么关联的更改. 你现在想做的事情是
将这两个更改分成两个不同的 commit 进行提交, 每个 commit 都有它自己的说明. 那么
你在 Subversion 中应该这么做:
$ svn diff foo.c > foo.patch
$ vi foo.patch
<edit foo.patch, keeping the changes I want to commit later>
$ patch -p1 -R < foo.patch  # remove the second set of changes
$ svn commit -m "First commit message"
$ patch -p1 < foo.patch  # re-apply the remaining changes
$ svn commit -m "Second commit message"
Sounds like fun? Now repeat that many times over for a complex, dynamic set of changes. Here’s the Git version, making use of the index:
听起来不错? 但是如果你如果用对付的是更复杂的情况呢? 下面是 Git 中的做法, 让我们 利用 the index:
$ git add --patch foo.c
<select the hunks I want to commit first>
$ git commit -m "First commit message"
$ git add foo.c  # add the remaining changes
$ git commit -m "Second commit message"
What’s more, it gets even easier! If you like Emacs, the superlative tool
gitsum.el, by Christian Neukirchan, puts a beautiful face on this potentially tedious process. I recently used it to tease apart 11 separate commits from a set of conflated changes. Thank
这是不是简单多了? 如果你喜欢 Emacs, 那么还有个工具叫 gitsum.el, 这个工具是由
Christian Neukirchan 开发的, 给这个可能看起来单调乏味的过程添加了一个漂亮的界面.
我最近实际上用它将一个更改拆分成 11 个独立的 commit 过. 真是谢谢 TA 了.
2.2 Taking the index further | 进一步了解 the index
Let’s see, the index… With it you can pre-stage a set of changes, thus iteratively building up a patch before committing it to the repository. Now, where have I heard that concept before…
根据上面所说的,我们可以如此来描述 the index 的功能: 通过它, 我们可以将一系列更改 暂存下来, 还可以在更改提交到 repository 之前, 将一次对分拣的更改分成若干的 patch. 我好像曾经在什么地方听到过这个…
If you’re thinking “Quilt!”, you’re exactly right. In fact, the index is little different from Quilt, it just adds the restriction of allowing only one patch to be constructed at a time.
你很可能会想到一个叫 “Quilt” 的软件. 事实上, the index 和 Quilt 有一点点不同, Quilt 实际上只是添加了一个 “一 次只允许对代码做出一个 patch 的更改” 的限定而已12.
But what if, instead of two sets of changes within
foo.c, I had four? With plain Git, I’d have to tease each one out, commit it, and then tease out the next. This is made much easier using the index, but what if I wanted to test those changes in various combinations with each other before checking them in? That is, if I labelled the patches A, B, C and D, what if I wanted to test A + B, then A + C, then A + D, etc., before deciding if any of the changes were truly complete?
但是如果我在文件 foo.c 中实际上一共有四组的更改呢? 在原生的 Git 中, 我实际上需
要一个一个的将属于其中一个 patch 的更改挑选出来, commit, 然后再回去选下一组的.
The index 实际上已经大大简化了这个过程, 但是如果我想在提交这些更改前, 对这些更改
的多种组合分别做测试呢? 比方说我有四个 patch, 它们分别是 A, B, C, D. 如果我想以
这种顺序进行测试: A + B, 然后 A + C, 随后 A + D, 以此类推. 那么我应该怎么做呢?
There is no mechanism in Git itself that allows you to mix and match parallel sets of changes on the fly. Sure, multiple branches can let you do parallel development, and the index lets you stage multiple changes into a series of commits, but you can’t do both at once: staging a series of patches while at the same time selectively enabling and disabling some of them, to verify the integrity of the patches in concert before finally committing them. What you ’d need in order to do something like this would be an index which allows for greater depth than one commit at a time. This is exactly what Stacked Git provides.
Here’s how I’d commit two different patches into my working tree using plain Git:
在 Git 中并没有这样的功能. 多分支确实可以让你完成平行开发, the index 也确实可以 让你将更改拆成若干个 commit, 但是实际上你并不能同时做这两个事情: 你不能暂存下一 系列 commit 中的更改, 然后去选择其中一些出于启用/关闭的状态, 以此来在提交前验证 更改的正确性.
你实际上想做的事情是希望你的 the index 中, 可以存下多个 commit13, 这个功能 实际上可以由 Stacked Git 来提供的.
以下是我 commit 两个不同的更改组到我的 working tree 的过程:
$ git add -i # select first set of changes
$ git commit -m "First commit message"
$ git add -i # select second set of changes
$ git commit -m "Second commit message"
This works great, but I can’t selectively disable the first commit in order to test the second one alone. To do that, I’d have to do the following:
这样实际上还不错, 但是我无法在做完这一切之后, 再将第一个 commit 暂时禁用, 来单独 测试第二个 commit. 如果我想做这个事情, 那么我接下来还得做这么一个事情:
$ git log # find the hash id of the first commit
$ git checkout -b work <first commit’s hash id>
$ git cherry-pick <second commit’s hash id>
<... run tests ...>
$ git checkout master # go back to the master "branch"
$ git branch -D work # remove my temporary branch
Surely there has to be a better way! With
stgI can queue up both patches and then re-apply them in whatever order I like, for independent or combined testing, etc. Here’s how I’d queue the same two patches from the previous example, usingstg:
但是应该会有更好的方法. 使用 stg 命令, 我可以对两个 patch 进行任意顺序的排序,
然后按这个顺序来应用它. 这样就可以进行独立测试/组合测试了. 以下是一个例子:
$ stg new patch1
$ git add -i  # select first set of changes
$ stg refresh --index
$ stg new patch2
$ git add -i  # select second set of changes
$ stg refresh --index
Now if I want to selectively disable the first patch to test only the second, it’s very straightforward:
那么完成上面说的事情就非常简单了:
$ stg applied
patch1
patch2
<...  do tests using both patches ...>
$ stg pop patch1
<...  do tests using only patch2 ...>
$ stg pop patch2
$ stg push patch1
<...  do tests using only patch1 ...>
$ stg push -a
$ stg commit -a  # commit all the patches
This is definitely easier than creating temporary branches and using
cherry-pickto apply specific commit ids, followed by deleting the temporary branch.
这比上面提到的建立临时分支并使用 cherry-pick 来应用特别的 commit 哈希值, 后面
再把他删掉的方式舒服多了.
3 Reset
3.1 To reset, or not to reset | 要不要 reset, 这是一个问题
One of the more difficult commands to master in Git is
reset, which seems to bite people more often than other commands. Which is understandable, giving that it has the potential to change both your working tree and your current HEAD reference. So I thought a quick review of this command would be useful.
在 Git 中比较麻烦的命令之一就是 reset, 大家似乎都更容易在这个命令上遇到问题.
看起来这个命令由于同时更改了你的 working tree 和你当前的 HEAD 指针, 所以会显得
难以理解. 所以我这里需要快速提一下这个命令的作用.
Basically,
resetis a reference editor, an index editor, and a working tree editor. This is partly what makes it so confusing, because it’s capable of doing so many jobs. Let’s examine the difference between these three modes, and how they fit into the Git commit model.
简单来说, reset 是一个能编辑 HEAD / index / working tree 的工具. 这可以部分解
释它为什么看起来这么难懂, 因为它实际上确实一下子完成了很多很多工作. 我们会在下
面慢慢解释上面提到的三种模式之间的区别, 以及它们在我们前文建立的, 从 commit 的
角度理解 Git 的模型中, 到底是如何工作的.
3.2 Doing a mixed reset | 应用一个 mixed reset
If you use the
--mixedoption (or no option at all, as this is the default), reset will revert parts of your index along with your HEAD reference to match the given commit. The main difference from--softis that--softonly changes the meaning of HEAD and doesn’t touch the index.
如果你使用了 --mixed 这个选项 (如果你不带参数调用, 那么默认就是它), reset 命
令会在将你的 HEAD 指针指向给定的那个 commit, 同时调整 index, 使其与 HEAD 匹配.
--soft 和这个选项的区别在于, --soft 并没有更改 index.
$ git add foo.c  # add changes to the index as a new blob
$ git reset HEAD  # delete any changes staged in the index
$ git add foo.c  # made a mistake, add it back
3.3 Doing a soft reset | 应用一个 soft reset
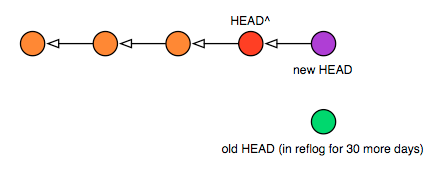
If you use the
--softoption toreset, this is the same as simply changing your HEAD reference to a different commit. Your working tree changes are left untouched. This means the following two commands are equivalent:
如果你加上了 --soft 选项, 那么这个 reset 命令就非常的简单易懂了: 实际上和你
直接把你的 HEAD 指针指向了另一个不同的 commit 没什么两样. 你的 working tree
中的所有更改都会在执行完 reset 之后原样保留. 这意味着下面写的两条命令是完全等价
的:
$ git reset --soft HEAD^     # backup HEAD to its parent,
                             # effectively ignoring the last commit
$ git update-ref HEAD HEAD^  # does the same thing, albeit manually
In both cases, your working tree now sits on top of an older HEAD, so you should see more changes if you run
status. It’s not that your files have been changed, simply that they are now being compared against an older version. It can give you a chance to create a new commit in place of the old one. In fact, if the commit you want to change is the most recent one checked in, you can usecommit --amendto add your latest changes to the last commit as if you’d done them together.
在上述的两种情况里, 运行完 reset 之后, 你的 working tree 中的文件内容是领先于
你的 HEAD 的, 所以如果你运行 status 命令来查看变更的情况, 你会看到的实际上是
你的 working tree 和一个更老的 HEAD 的差别. 这使得你可以在老的 HEAD 上重新建立
一个新的 commit, 事实上 commit --amend 这个命令做的事情就是类似于这样的.
But please note: if you have downstream consumers, and they’ve done work on top of your previous head — the one you threw away — changing HEAD like this will force a merge to happen automatically after their next pull. Below is what your tree would look like after a soft reset and a new commit:
但是请注意一下: 如果你有下游用户, 而他们使用了被你 reset + commit 之后丢弃掉
的那个 commit 的话, 那么像这样去更改你的 HEAD, 将会在他们的下一个 pull 时导致
一个自动出现的强制 merge. 下图是你的 repository 在执行完 soft reset 之后又提交
了一个新的 commit 之后的样子:
And here’s what your consumer’s HEAD would look like after they pulled again, with colors to show how the various commits match up:
而下图是你的下游用户下一次 pull 之后的情况:
可以从其中给 commit 上的颜色看出来这些 commit 是如何对应的.
3.4 Doing a hard reset | 应用一个 hard reset
A hard reset (the
--hardoption) has the potential of being very dangerous, as it’s able to do two different things at once:
hard reset 操作起来有一定的风险, 它能同时完成两件不同的事情:
First, if you do a hard reset against your current HEAD, it will erase all changes in your working tree, so that your current files match the contents of HEAD. There is also another command,
checkout, which operates just likereset --hardif the index is empty. Otherwise, it forces your working tree to match the index.
首先, 如果你对你当前的 HEAD 做 hard reset, 这将从你的 working tree 中抹去所有的
更改, 这样一来你的 working tree 就和你的 HEAD 指向的那个 commit 完全一致了. 如
果你的 index 是空的的话, 其实还有一个命令叫 checkout 同样能做到这个事情. 如果
你的 index 不空, 那么对某个文件进行 checkout 命令只会使得 working tree 中的文件
和 index 中一致.
Now, if you do a hard reset against an earlier commit, it’s the same as first doing a soft reset and then using reset
--hardto reset your working tree. Thus, the following commands are equivalent:
如果你对一个之前的 commit 调用 reset 命令, 那么这个事情和先使用 soft reset 之后 再使用 hard reset 来重置你的工作区是完全一致的. 所以说下面的两组命令是等价的:
$ git reset --hard HEAD~3  # Go back in time, throwing away changes

$ git reset --soft HEAD~3  # Set HEAD to point to an earlier commit
$ git reset --hard  # Wipe out differences in the working tree
As you can see, doing a hard reset can be very destructive. Fortunately, there is a safer way to achieve the same effect, using the Git stash (see the next section):
读过以上的内容, 我们可以发现: 一个 hard reset 很可能是具有破环性的. 幸运的是, 我 们实际上有一种更安全的方法来完成同样的事情, 只要使用下一节中提到的 Git stash 命 令就可以了:
$ git stash
$ git checkout -b new-branch HEAD~3   # head back in time!
This approach has two distinct advantages if you’re not sure whether you really want to modify the current branch just now:
当你并不确定你是否要对当前的分支进行修改的时候, 这种方法有两个明显的优点:
- It saves your work in the stash, which you can come back to at any time. Note that the stash is not branch specific, so you could potentially stash the state of your tree while on one branch, and later apply the differences to another.
- It reverts your working tree back to a past state, but on a new branch, so if you decide to commit your changes against the past state, you won’t have altered your original branch.
- 这样可以将你的工作保存在 stash 中, 你随时可以再回到你原来的工作状态. 需要注意 的是这个 stash 和分支无关, 你完全可以在某个分支上将你当前的 working tree 存 入, 而随后在另一个分支上取出它.
- 这样操作的确将代码回退到了过去的状态, 但是是在一个新的分支上, 如果你决定在过 去的状态上修改, 这并不会影响到你原先那个更快的分支.
If you do make changes to
new-branchand then decide you want it to become your new master branch, run the following commands:
如果你对 new-branch 做出了更改, 然后想让它成为你新的主分支, 可以运行以下的命令来 完成这件事情:
$ git branch -D master  # goodbye old master (still in reflog)
$ git branch -m new-branch master  # the new-branch is now my master
The moral of this story is: although you can do major surgery on your current branch using
reset --softandreset --hard(which changes the working tree too), why would you want to? Git makes working with branches so easy and cheap, it’s almost always worth it to do your destructive modifications on a branch, and then move that branch over to take the place of your old master. It has an almost Sith-like appeal to it…
以上的事情是在告诉你: 尽管你是可以用 reset –soft 和 reset –hard 命令来操作你当 前的分支,但是你几乎没有理由必须在你当前的分支上这么做. Git 让分支相关的操作变得 简洁而容易, 所以我们往往都将可能有破坏性的操作放在另一个分支上操作, 完成以后再 移动回来, 这种操作方式几乎在任何情况下都比直接在原分支上修改更为优秀.14
And what if you do accidentally run
reset --hard, losing not only your current changes but also removing commits from your master branch? Well, unless you’ve gotten into the habit of using stash to take snapshots (see next section), there’s nothing you can do to recover your lost working tree. But you can restore your branch to its previous state by again usingreset --hardwith the reflog (this will also be explained in the next section):
那么如果你不小心运行了 hard reset, 然后同时丢失了你当前的更改和之前的一部分
commit 有办法弥补么? 除非你已经养成了使用 stash 来建立快照, 否则几乎没有办法来挽
回这种情况对于 working tree 带来的损失, 但是你可以将你的分支回溯到它之前的那个
状态. 只要像下面这样使用 reset --hard 这个命令就可以了:
$ git reset --hard HEAD@{1} # restore from reflog before the change
下一节我们来解释上面这条命令的意思.
To be on the safe side, never use
reset --hardwithout first runningstash. It will save you many white hairs later on. If you did run stash, you can now use it to recover your working tree changes as well:
为了安全起见, 我们不应该在运行 stash 之前使用 reset --hard. 这个习惯将让你少
掉几根头发. 如果你跑过 stash, 你实际上就可以使用它来还原你的 working tree:
$ git stash  # because it's always a good thing to do
$ git reset --hard HEAD~3  # go back in time
$ git reset --hard HEAD@{1}  # oops, that was a mistake, undo it!
$ git stash apply  # and bring back my working tree changes
4 Stashing and the reflog | Stash 和 reflog
Until now we’ve described two ways in which blobs find their way into Git: first they’re created in your index, both without a parent tree and without an owning commit; and then they’re committed into the repository, where they live as leaves hanging off of the tree held by that commit. But there are two other ways a blob can dwell in your repository.
直到现在我们描述过两种在 Git 中找到某个 blob 的方法:
- 当 blob 在你的 index 中被创建时, 此时还没有一个 tree 在引用它们, 它们也没有被 某个 commit 所拥有, 这时我们可以通过 index 来找到它;
- 随后它们被提交给你的 repository, 之后 blob 就成为了 被某个 commit 管理的 tree 上的叶节点.
但是实际上在 Git 中还有两种 blob 存在的形式.
The first of these is the Git
reflog, a kind of meta-repository that records — in the form of commits — every change you make to your repository. This means that when you create a tree from your index and store it under a commit (all of which is done bycommit), you are also inadvertently adding that commit to the reflog, which can be viewed using the following command:
第一种就是 Git reflog, 这是一种以 commit 的方式记录了所有你对你的 repository
做出的更改的 meta-repository. 这意味着当你从一个 index 建立一个 tree, 并且将它
存在一个 commit 中的时候, 你实际上无意之中也将这个 commit 添加到了 the reflog
中. 你可以通过以下的命令查看 the reflog:
$ git reflog
5f1bc85...  HEAD@{0}: commit (initial): Initial commit
The beauty of the reflog is that it persists independently of other changes in your repository. This means I could unlink the above commit from my repository (using
reset), yet it would still be referenced by the reflog for another 30 days, protecting it from garbage collection. This gives me a month’s chance to recover the commit should I discover I really need it.
the reflog 的妙处就在于它与其他你对你的 repository 做出的更改是独立的. 这意味着
当我将上面的命令展示的那个 commit 从我的 repository 中解除链接的时候 (比方说我
跑了一个 reset), 这个 commit 仍然被这个 meta-repository, 也就是 the reflog 所
引用, 直到 30 天以后, 这个 commit 才会进入垃圾回收系统的考虑范围. 这使得你有一
个月的时间来找回你需要的 commit.
The other place blobs can exist, albeit indirectly, is in your working tree itself. What I mean is, say you’ve changed a file
foo.cbut you haven’t added those changes to the index yet. Git may not have created a blob for you, but those changes do exist, meaning the content exists — it just lives in your filesystem instead of Git’s repository. The file even has its own SHA1 hash id, despite the fact no real blob exists. You can view it with this command:
尽管很显然, 但是实际上还有一个地方是 blob 可以呆的, 那就是你的 working tree. 我
的意思是说, 如果你更改了一个文件, 比如说 foo.c 但是还没有将这个更改添加到 the
index 中, 那么由于我们说 blob 的本质是数据本身, 所以即使 Git 并没有建立对应的
blob, 数据本身也仍然是存在的, 只不过是存在于你的文件系统中罢了. 这个文件本身实际
上是有 SHA1 值的, 尽管其实并没有实际上的 blob 存在. 我们可以通过下面这条命令来
查看它:
$ git hash-object foo.c
<some hash id>
What does this do for you? Well, if you find yourself hacking away on your working tree and you reach the end of a long day, a good habit to get into is to stash away your changes:
这意味着啥呢? 如果你在你的 working tree 中到处乱改, 然后经过了漫长的一整天工作, 将所有的更改都用 stash 存起来会是一个好习惯:
$ git stash
This takes all your directory’s contents — including both your working tree, and the state of the index — and creates blobs for them in the git repository, a tree to hold those blobs, and a pair of stash commits to hold the working tree and index and record the time when you did the stash.
这个命令将你的那个目录中的所有内容 — 包括你的 working tree, 甚至是 the index 的 状态 — 都保存了下来, 并且为它们在 Git repository 中创建了 blob, 以及一个 tree 来管理这些 blob, 还有一对 stash commit 来管理你的 working tree 和 index 还得记 录下你执行 stash 命令的时间.
This is a good practice because, although the next day you’ll just pull your changes back out of the stash with
stash apply, you’ll have a reflog of all your stashed changes at the end of every day. Here’s what you’d do after coming back to work the next morning (WIP here stands for “Work in progress ”):
尽管你第二天会把所有的更改都用 stash apply 命令从 stash 中重新拉出来, 但是做完
这件事情之后你相当于在 reflog 中存了一个你每天工作的结果的快照. 第二天你回来工
作的时候需要做的事情如下:
$ git stash list
stash@{0}: WIP on master: 5f1bc85...  Initial commit

$ git reflog show stash # same output, plus the stash commit's hash id 2add13e... stash@{0}: WIP on master: 5f1bc85... Initial commit

$ git stash apply
其中WIP意味着 “Work in progress”
Because your stashed working tree is stored under a commit, you can work with it like any other branch — at any time! This means you can view the log, see when you stashed it, and checkout any of your past working trees from the moment when you stashed them:
因为你已经把 working tree 存在了一个 commit 里面, 所以你任何时候都实际上可以把他 当作一个分支一样来看待. 这意味着你甚至可以查看日志, 可以看你 stash 的时间, 以及 将你过去存进 stash 的 working tree 重新取出:
$ git stash list
stash@{0}: WIP on master: 73ab4c1...  Initial commit
...
stash@{32}: WIP on master: 5f1bc85...  Initial commit
$ git log stash@{32}  # when did I do it?
$ git show stash@{32}  # show me what I was working on
$ git checkout -b temp stash@{32}  # let’s see that old working tree!
This last command is particularly powerful: behold, I’m now playing around in an uncommitted working tree from over a month ago. I never even added those files to the index; I just used the simple expedient of calling
stashbefore logging out each day (provided you actually had changes in your working tree to stash), and usedstash applywhen I logged back in.
最后那个命令其实非常的有用: 你看, 我可以把一个月前没有 commit 的 working tree 重
新拿出来玩. 我甚至从来没有把这些文件添加到 the index 中; 只不过是在我每天下班关
机之前运行了一次 stash 命令而已. 然后第二天上班的时候, 只要 stash apply 就
行了.
If you ever want to clean up your stash list — say to keep only the last 30 days of activity — don’t use
stash clear; use thereflog expirecommand instead:
但是如果你什么时候想清理你的 stash 列表了, 比方说想把 30 天之前的 stash 的历史删
掉15, 那么麻烦不要使用 stash clear — 那样你将会丢失所有 stash 中的历史;
而应该使用 reflog expire 命令:
$ git stash clear  # DON'T! You'll lose all that history
$ git reflog expire --expire=30.days refs/stash
<outputs the stash bundles that've been kept>
The beauty of
stashis that it lets you apply unobtrusive version control to your working process itself: namely, the various stages of your working tree from day to day. You can even usestashon a regular basis if you like, with something like the followingsnapshotscript:
stash 的妙处就在于让你可以做一些不那么刻意的版本控制, 比如说像上面那样每天保存
一下工作进度. 你愿意的话甚至可以定期的运行 stash, 比如通过下面这样的脚本:
$ cat <<EOF > /usr/local/bin/git-snapshot
#!/bin/sh
git stash && git stash apply
EOF
$ chmod +x $_
$ git-snapshot
There’s no reason you couldn’t run this from a
cronjob every hour, along with running thereflog expirecommand every week or month.
没有什么理由能阻止你使用 cron 来每个小时跑一次这个命令, 如果担心仓库太大, 完全
可以同时每个月或者每周跑 reflog expire.
5 Conclusion | 结论
Over the years I’ve used many version control systems, and many backup schemes. They all have facilities for retrieving the past contents of a file. Most of them have ways to show how a file has differed over time. Many permit you to go back in time, begin a divergent line of reasoning, and then later bring these new thoughts back to the present. Still fewer offer fine-grained control over that process, allowing you to collect your thoughts however you feel best to present your ideas to the public. Git lets you do all these things, and with relative ease — once you understand its fundamentals.
在过去的几年中我使用过非常多的版本控制系统, 以及很多种的备份模式. 它们都有一系列 工具来追回过去文件的内容. 大部分工具都有展示一个文件随着时间发展如何一步步被更 改的的方式. 很多工具都可以让你穿越时间回到过去, 让你在过去做一些尝试, 然后把产 生的想法重新带回现在. 还是有很小一部分提供了对这个过程的良好的控制机制, 让你可 以良好的操作过去的历史, 可以以任意你喜欢的方式整理好你的想法, 然后将它展示给公 众. Git 可以让你做到上述的一切. 甚至相对来说还是比较容易地做到这一切 — 只要你 真的搞懂了 Git 的原理.
It’s not the only system with this kind of power, nor does it always employ the best interface to its concepts. What it does have, however, is a solid base to work from. In the future, I imagine many new methods will be devised to take advantage of the flexibilities Git allows. Most other systems have led me to believe they’ve reached their conceptual plateau — that all else from now will be only a slow refinement of what I’ve seen before. Git gives me the opposite impression, however. I feel we’ve only begun to see the potential its deceptively simple design promises.
这不是唯一一个有这些能力的系统, 它也没有对于它的理念提供最好的交互. 但是 Git 拥 有的这些东西, 却的的确确是一个进一步开发的好基础. 在未来, 我可以预想存在着很多 更好的工具被发明出来, 它们能更好地利用 Git 类似的构造提供的这种种便利. 其他的大 部分系统都让我相信它们到达了他们的瓶颈期 — 它们要不然就像我之前见到的那样在慢 慢慢慢地进行改进, 要不然将来也会进入这样的状态. Git 却给了我一个更为乐观的印象. 我感觉我们即将见识到它出乎人意料的简单的涉及理念中爆发出来的潜力.
6 Further reading | 阅读更多
If your interest to learn Git more has been piqued, please check out the following articles:
如果你还想学一些 Git 可以看看下面这些文章:
- A tour of Git: the basics - http://cworth.org/hgbook-git/tour/
- Manage source code using Git - http://www.ibm.com/developerworks/linux/library/l-git/
- A tutorial introduction to git - http://git-scm.com/docs/gittutorial
- GitFaq — GitWiki - https://git.wiki.kernel.org/index.php/GitFaq
- A git core tutorial for developers - http://www.kernel.org/pub/software/scm/git/docs/gitcore-tutorial.html
- git for the confused - http://www.gelato.unsw.edu.au/archives/git/0512/13748.html
- The thing About Git - http://tomayko.com/writings/the-thing-about-git
-
译者注: 这个描述貌似和上面对 working tree 的描述有冲突, 上面对 working tree 的说法是 working tree 包含了
.git子目录,但是出于译者对 commit 的认识而 言, commit 中应该没有.git中的相关信息. 这里可以尝试理解为文中说的 working tree 是类似工作区的概念, 并不包括.git子目录. ↩︎ -
译者注: 这个地方括号中的内容不知道怎么翻译, 可以理解为, “我们还有很多关于 commit 的东西马上就要谈到”, 但是感觉和上下文不搭. ↩︎
-
译者注: 有理由相信 github 可以用这个方式来省钱, 这样 fork 出来的 repository 就不会那么占空间了. ↩︎
-
译者注: 这个地方我皮了一下, 但是实际上我并不确定原文是不是这个意思. ↩︎
-
译者注: 最后这句话的翻译不确定是否正确. ↩︎
-
译者注: 这个时候真的还没有 “master” 这个分支么? 为什么可以说是 create 呢? ↩︎
-
译者注: 这里的 “first” 是按提交 commit 的时间排序的么? ↩︎
-
译者注: 毕竟你可以将 “name^” 看作是一个 “name” 嘛. ↩︎
-
译者注: 实际上这些内容可以在命令
git help show-branch中看到. ↩︎ -
译者注: 虽然实际上并不是这样, 因为每个 commit 中的 tree 都只是一个快照而已.
另外上面这段话我个人觉得可以这样理解:
commit 是一个 object, 在 Git 中一个 object 的名字是由它的 SHA1 值来决定的, 而 SHA1 值是由内容决定的. 那么当我们说, 一个 commit 被改变的时候, 我们实际 上想表达的意思是, 这个 commit 的 SHA1 值发生了变化, 也就是 commit 的内容发 生了变化.
根据前文的说法我们知道, 一个 commit 中, 是包含有它的父 commit 的引用的, 如果 一个 commit 的父 commit 被用
rebase指令改掉了, 那么它本身的 SHA1 值是会 发生变化的, 而它本身发生了变化之后, 所有直接或者间接引用了它的其他 commit 的值也都会因为这样的理由而发生变化. ↩︎ -
译者注: 这里的 tree 指的是被新 commit 直接管理的那个 tree 的 sub-tree. ↩︎
-
译者注: 这里我并不确定是不是这个意思, 因为译者并没有使用过 Quilt, 这句是根据 维基猜的, 主要是前面那个 it 不知道指的是谁. ↩︎
-
译者注: 这里的意思应该是, 如果你的暂存区里有多个 commit, 那么你就可以把他们 以任意的组合加到 repository 中, 然后就可以实现上面说的那个事情了. ↩︎
-
译者注: 最后一句貌似是个星战梗, 不知道啥意思. Sith 是西斯, 星战的反派. ↩︎
-
译者注: 这里按前文的说法, stash 的历史也一样是由 reflog 保存的, 那么 reflog 本身只会保存 30 天历史, 所以这里手动清理应该没什么意义吧, 除非只是希望手动 完成一下垃圾回收器完成的事情? ↩︎